Concrete on the Farm, 1900-1940: Part 1--Sand
Part one of this series of discusses how a farmer in the early 1900s would go about getting clean concrete sand with which to make concrete..

A series by Luke M. Snell
In the early 1900s, the farmer that wanted to improve their farm by putting in a concrete floor in their barns, build a root cellar, or have a dry spot in front of a hog lot had to do it themselves. There were no concrete batch plants and few rural concrete contractors, so the farmer had to learn how to make and place concrete. Many cement companies and farm organizations developed publications that took the farmer through the process. We have more sophisticated equipment and improved materials today but the process remains much the same. I have worked in many third world countries and found that some of the techniques that the early farmers used are as useful today and can keep the contractor out of trouble. Part one of this series of discuses how to get clean concrete sand.
How to get clean sand
In most cases, the farmer was on his own to find a suitable sand to use in concrete. They knew that dirty sand (sand with clay and silt) would result in weaker concrete. Thus most publications presented a simple test to determine if the sand was usable in concrete. To do this test, you need a see-through container. The self help books of the time recommended a quart canning jar with a top - probably because they were available on most farms. I have used soda and juice bottles when doing this test. The bottle or jar should be about 8 inches high with straight sides. To do the test:
Get a representative sample of the sand. You should get samples from several locations in the sand pile or in the sand pit.
Mix the sand samples together and put the sand into the bottle to a depth of 2 inches.
Add water until the container is about 3/4 full.
Put a cap or thumb on top of the bottle and shake vigorously for one minute.
Place bottle on a flat surface and let it set for one hour.
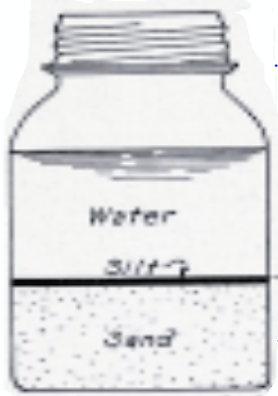
After the one hour, measure the fine particles that have settled on top of the sand. If it is less that 1/8 inch , the sand is considered clean; If it is greater than 1/8 inch, the sand would be considered dirty.

Silt test, from Permanent Farm Construction, Portland Cement Association, 1916.
If the test has over the 1/8 inch of silt and clay, the farmer has to make a decision. They can look for a different source of sand, wash the sand, or use this sand and add extra cement to maintain the required strength of the concrete.
I have used this method in Mexico and Mongolia when examining sands. I used a soft-drink bottle and followed the steps outlined above. It was a quick way to determine if the sand was acceptable or needed more detailed laboratory testing.
Two other steps are required to make sure the sand is acceptable for use. The farmer should examine the sand to see if it has organic content. The farmer should do a visual inspection looking for tree roots, leaves, animal waste, and construction waste in the sand. In most cases, this will be adequate. If there is doubt, a laboratory test that requires the use caustic chemicals can be performed. This is best done in the laboratory by experienced technicians. The sand piles or where the sand is stored should also be inspected.
Some examples of what can go wrong
Here are three examples of how inspection of the sand and sand piles easily identified a problem and one example where an inspection could not catch the problem.
I visited a batch plant that was having strength issues with their concrete. It was located in a wooded area and the sand piles had leaves and twigs falling on it. The organics in the sand was one of the problems that was causing low strength.
One of my previous students e-mailed me from a project he was working on outside the US. They were getting inconsistent concrete strength and he asked what he needed to do. I recommended he visit the batch plant and inspect the aggregates piles and the batching procedures. He observed broken pieces of masonry blocks and concrete waste scattered throughout the sand piles. The simple solution was to remove these from the sand pile.
During concrete placement, a contractor noticed balls in the concrete that he at first thought were cement balls (resulting from inadequate mixing of the concrete). But when one of the balls broken open, it was mud. Inspection of the sand pile at the batch plant showed that it was on the ground (instead of on a concrete base) and the operator had run the front end loader onto the sand pile. The mud balls in the concrete were caused by getting base material (mud) in the front end loader’s bucket plus the mud that was tracked onto the pile. The solution was to retrain the front end loader operator on correct procedures and put the sand onto a concrete pad.
While placing a concrete floor, the contractor noticed plants starting to grow in the concrete. I was asked to inspect the batch plant to determine what happened. Inspection of the materials and procedures did not indicate a problem. I later learned that the batch plant was having labor issues. I surmised that a disgruntled worker put a pick up truck load of soybeans onto the sand pile and mixed it in. Since the soybeans were basically the same size and color as the sand , a visual inspection of the sand pile did not catch the problem.
The farmer is now ready to move to the next step of gathering the other materials needed to make concrete.
About the Author(s)
You May Also Like


